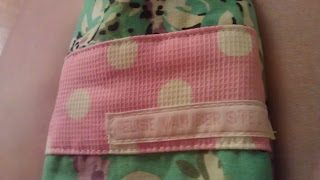
{ coin purse I made from scratch }
I've had the past few days off from work and it got my creative juices flowing. Now that I'm back in NY there are the lovely toll roads that I have to take to get places, and my change is always floating around my car, so I decided to make a coin purse to keep in my car with my change in it so that it's always handy when I need it!
This is going to be tricky because I don't make patterns...I just do. So here it goes:
I used 4 types of fabric that I had laying around. The green is a cotton blend, the pink was kinda see thru so I lined it with 2 pieces of white cotton and then I used brown fleece to make it more sturdy. For the measurements, I kinda just played around with it.
The pink polka dot fabric: 1 piece of 3 inches wide by 5 3/4 inches long for around the purse...I only did this on one side, I didn't wrap it all the way around.(I know that's a weird measurment, but I accidently used the centimeter side of my tape measure..which made it 14.5cm). The 2 pieces of white fabric I used to line it with are the same size. And for the top part, I used the same measurments but cut out 2 pieces
The white cotton fabric: Cut 2 pieces of the same size as the pink one if the fabric you chose is too see thru!
The green flowery fabric: 2 pieces of 5 3/4 inches wide by 10 1/2 inches long (I played around with the lenght because it seemed to long to me. I didn't want to have to reach my whole arm in it to get change out, so I think I cut of maybe 3 inches after I assembled it)
The brown fleece fabric: Same measurments as the green fabric.
1. Start by cutting your fabric. Make sure you iron out any creases because this is hardly impossible once you've assembled it.
2. Iron about 1/2 inch in to make kind of a roll seam so you can more easily attatch it to your base fabric
3. Put the band of fabric where you like it and top stitch it as close to the edge as you can.
{ I put a little name tag on it that my mom found and used to put on all my clothes so I knew which was mine. I thought it was a nice touch to add it to this }
4. Once you top stitch your band, top stitch the entire fabric, so that your green and brown fabric are attatched. Once again, stitch as close to the edge as you can
5. Then put the right sides in and stitch it all around EXEPT FOR THE TOP! Leave the top open!
6. Then take the bottom and put the sides together so that it creates a point, sew a straight line and cut off the extra
7. Turn your coin purse right side out so you can kinda see what it looks like
8. Sew the 2 top band pieces together on both sides
9. Take the band fabric and put the right sides together. Make sure the seams line up. Pin it, and then stitch it together
11. Then sew on the outside. This is kinda tricky because its pretty tight and it takes some patience
12. Time to put your ribbon inside the top part. I usually put a safety pin in the ribbon so that its easier to guide it thru the top.
13. YOU ARE DONE!! :)
If you have any questions or need some more explaining..please email me and I'll try my best to help you out!!
{ personalized }
Hope ya'll enjoyed this tutorial!!
xoxo E


No comments:
Post a Comment